Here is a FREE, simple, and virtually seamless way to fix damaged teak. This is a process known as "Dutching-In", according to my friend Robert Salnick
Anyway, I had this Damaged Fiddle Rail on the Table on my Catalina 30. It isn't surprising, being that the table is made of particle board and weighs about a million pounds. But rather than taking the time to fix it properly, the Previous Owner (PO) decided to glue some of it back together using some sort of foamy glue, and to fill in the rather large voids with that "Rock Hard" stuff you can buy at the hardware store... it is a powder that you mix with water and then mold it into place and let it dry, which would be fine if you were going to paint it..... it looked awful on the varnished teak.
So the first thing to do was to clean out all of that crap, and then re-split the fiddle and re-glue the split with some proper wood glue... I used Gorilla Glue due to its water resistant properties. Then I clamped it tight with Duct tape (yet another use for this wonderful stuff....
After drying overnight, I was left with this fairly large V shaped void.
The trick here is to use some scrap Teak, and embed it with the grain running in the same direction. I happened to have a couple of teak scraps from the project in the head replacing the counter.
I cleaned up the void a little bit to get it ready for the patch....
So I took the scrap, and split it a bit wider than I needed.
Then it was a matter of whittling down the Piece until it would fit in the void.
Just keep whittling away what doesn't belong and test the fit once in awhile (I would have my other hand on the carving knife, but then how would I take the picture?)
Just take your time and keep whittling and test fitting...
and test and so on and so on.
Eventually you will get it the right size to fit in the void. Take your time, don't hurry it, and enjoy the process of making something with your own two hands....
The test fit is good!
Now glue it in with the Gorilla wood glue.... Notice the patch is a little big and stands proud of the fiddle surface...
The glue has dried, and now it is time to take a sanding block to it so we and get it level with the rest of the fiddle surface.
Now that is a bit more like it! Notice I still have a gap in the middle... Not for much longer!
I learned a couple of things with the earlier process. This time I am going to square out the void. It will make it MUCH easier to Whittle a patch for it.... Here I am starting to square it out...
See what I mean about being easier to whittle a patch? I made this one in no time!
Once I have split the patch to the correct depth, again, thick enough that is stands proud a bit... it is time to glue it in!
After drying, sand with a sanding block.... actually I found using the pad sander from my multi-tool worked great for these small jobs!
I cleaned these up with a little thinner to get a sneak preview of what the might look like when the get some varnish on them... Which one got the facelift?
So now the fiddle is ready to Install on the newly refinished table (a subject for another Blog Post) If you didn't know what you were looking for, you may not notice that this fiddle got a face lift! and it isn't even varnished yet!
While a little time consuming, the results are well worth it! Do you have any wood trim anywhere that needs a facelift of its own?
Now that I teased you with the new table refacing, I will blog on that next! Stay tuned! MUCH MUCH more to come!
JEM
Tuesday, April 29, 2014
Dutching it in
I don't know how the term originated... whether it is a compliment or derogatory. But it is an effective method to repair damaged wood. Please welcome new contributor John, aboard s/v Dulcinea! In his initial contribution, John takes us on a tour of "Dutching-in"...


Thursday, April 24, 2014
Want Your Ropes to Wear Like Iron? Maxijacket!
Drew at Sail Delmarva is hard at work again. He has built two machines for torture testing rope, and has discovered a product that we should all have aboard. Read on...
I investigated this product primarily on a whim. A magazine editor had asked about it in passing, and someone had given me a sample of a related product, Spinlock RP25. I didn't expect a whole lot from some liquid coating, or at least not the results I would get from some physical covering. And I was dead wrong.
Both were sawed on the grindstone for 4 minutes: Spinlock RP25 on the top and Maxijacket on the bottom. As a baseline, bare rope looked like the RP25 in 2 minutes.The Spinlock RP25 does have its applications too. It performs better on HMPE ropes (Amseel et. al.), reducing both wear and cover/core slippage, and has the flexibility to use on running sections of rope. I'l use RP25 on section of my Amsteel lifelines.
Who would think a simple coating could out-last plain rope by 6-8 times? Who would think it could out-last clear vinyl tubing by 10 times? Where the grindstone could cut a rope in half in 5 minutes, with Maxijacket it is barely scuffed.
Applications? I'm testing many things, mostly applications where traditional chafing gear doesn't fit. Defender marine is dipping all of the chain-to-rope splices, and Brian Toss tells me he's dipping most halyard splices. The furler drum exit is a tough spot, particularly if you use the genoa partly furled much.
Mooring lines, with and without coating. I tried chafe gear, but it kept creeping off. This is easier to clip and extends the life of the wear section to match the rest of the line.
Topping lift. Abrasion was the problem, so I used some webbing as a thimble and dipped the whole knot. This allows me to down-size from 3/8" to 5/16", saving some windage.
Just too good not to share. It seems impossible that a product resembling thick latex varnish (you can get clear and colors) can make such a a difference. While West Marine charges more than you want for more than you need, Knot and Rope sell a small jar--probably all a sailor needs for a few years-- for $7.10. A bargain.
-------
It seems my marine science project business has gotten completely out-of-control, with no less than 9 projects underway plus follow-ups. Clear vinyl, glycols and coolants, rope, vapor filters. Then there are possible investigations into heater efficiency and operation. Crazy... and fun.


Tuesday, April 22, 2014
Fill'er up
This post originally appeared on Windborne in Puget Sound
So, you have a beautiful, bright-finished teak and holly sole. And your brother-in-law brought along his favorite piece of heavy steel 3" angle iron when he came aboard to spend the night (not telling you of course). And he dropped it when getting his jammies out of his duffel.
Now you have a big ugly gouge marring your beautiful sole. What to do?
I can tell you that it is possible to fill such a gouge with varnish - our Previous Owner had a TV fall onto the sole - came off of the mount in a seaway. Not a flat screen... remember those big heavy things with the big cathode ray tube? Yeah, one of those. It made a gouge about 1" x 1" and perhaps 1/4" deep. I did manage to fill it in with varnish - a little at a time. If you put in too much, it will skin over and not cure. It took weeks and weeks, all the while with an upside down margerine tub taped over it to keep us from stepping on the work in progress.
I now have a better way.
Use 5-minute epoxy. It fills the gouge without shrinking, and it cures in, well, 5 minutes.
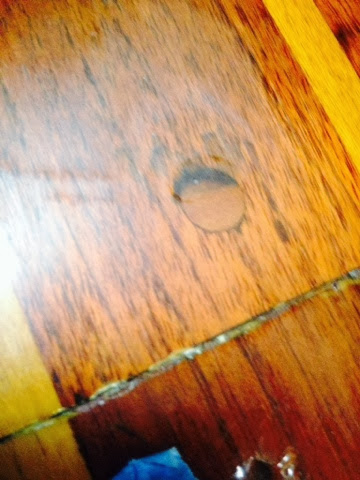
Here is an example from the sole in our forward cabin, which I am preparing to refresh. The example is of a bung that chipped out when the sole was installed 36 years ago. It has been varnished over many times, but there is still a hole there:
After the epoxy cures, it will need to be sanded flush. To do this without sanding thru the adjacent areas, first tape around the epoxy:
Now you'll be able to sand it flush to the floor, minus the thickness of the tape. I used 150 grit open coat aluminum oxide paper from Norton.
Only use light pressure on the sand paper. If you press hard, the paper will conform to the contour of the bump you are sanding - you don't want this. Instead, you want the paper to cut the high spots, and eventually the entire bump. If you find that you need to press hard to make the sand paper cut, then it is dull - it is time for a fresh surface or a fresh sheet.
When you have the repair down as far as you can get with the tape in place, remove the tape (it will probably be partly sanded thru), and carefully take the repair down the last couple of mills until it is flush. Then remove the 150 grit scratches with 220 grit paper.
Here's a big gouge that was also in the area being refinished. Sadly, I didn't have the foresight to document the process using this one. It too is now ready for varnish.
I imagine that the correct way to handle the big gouges would be to dutch in a small piece of teak. I may give that a try in the future.
So, you have a beautiful, bright-finished teak and holly sole. And your brother-in-law brought along his favorite piece of heavy steel 3" angle iron when he came aboard to spend the night (not telling you of course). And he dropped it when getting his jammies out of his duffel.
Now you have a big ugly gouge marring your beautiful sole. What to do?
I can tell you that it is possible to fill such a gouge with varnish - our Previous Owner had a TV fall onto the sole - came off of the mount in a seaway. Not a flat screen... remember those big heavy things with the big cathode ray tube? Yeah, one of those. It made a gouge about 1" x 1" and perhaps 1/4" deep. I did manage to fill it in with varnish - a little at a time. If you put in too much, it will skin over and not cure. It took weeks and weeks, all the while with an upside down margerine tub taped over it to keep us from stepping on the work in progress.
I now have a better way.
Use 5-minute epoxy. It fills the gouge without shrinking, and it cures in, well, 5 minutes.
Here is an example from the sole in our forward cabin, which I am preparing to refresh. The example is of a bung that chipped out when the sole was installed 36 years ago. It has been varnished over many times, but there is still a hole there:
 |
| 5-minute epoxy applied |
 |
| Tape (and a sticky note, lower right) |
Only use light pressure on the sand paper. If you press hard, the paper will conform to the contour of the bump you are sanding - you don't want this. Instead, you want the paper to cut the high spots, and eventually the entire bump. If you find that you need to press hard to make the sand paper cut, then it is dull - it is time for a fresh surface or a fresh sheet.
When you have the repair down as far as you can get with the tape in place, remove the tape (it will probably be partly sanded thru), and carefully take the repair down the last couple of mills until it is flush. Then remove the 150 grit scratches with 220 grit paper.
 |
| Ready for varnish |
 |
| Your brother-in-law been here? |
I imagine that the correct way to handle the big gouges would be to dutch in a small piece of teak. I may give that a try in the future.
Thursday, April 17, 2014
Access: Improvement
There are very, very few "one-off" tasks. In fact, if you find yourself saying something like, "Well, I'll never do that again", you should be on guard. Whenever you have to do something, you should try to make it easier for the next time. TC and Kelly on s/v Wind Strider apply this principle...
Since the major projects were accomplished over the last couple winters, nothing huge is planned, just maintenance and refinements. This page will be updated as projects are completed.
Water Lines
Under maintenance, the water lines are being replaced. Last summer, Kelly noticed an off taste in the water. Since the water lines appear to be OEM and the line from the tank to the pump had rotted at one point, it is probably a good time to replace the lines.
Going with PEX, commonly used in new house construction. A couple reasons for the selection: First, it is tougher than vinyl. Second, it will not break should it freeze. But, with any new tech, there are challenges: PEX does not fit vinyl fittings.
The water tank fitting was the biggest challenge, requiring the removal of the plexiglass tank top. Once the top was removed, found the tank itself had a thin film of growth. While cleaning it, I realized the tank must be cleaned more often, but removing and reinstalling 34 x 2in screws to pull the tank top, was not fun. Something easier was required and the solution was a 9 1/4in Whale TCL-4 Watertight Locker Door (LD4002) installed while the tank top was off.
The hatch sticks up about 3/4in above the tank top.
With Hypervent under mattress pads, the hatch has very little impact under our feet.
Installation was straight forward requiring a jig saw, drill, 10x 1in #10-24 SS nuts and bolts along with aquarium quality silicon sealant. Now, instead of having to deal with the 34 screws, I simply twist off the hatch cover.


Tuesday, April 15, 2014
Sun Cover for Dodger Windows - Part 2
Last week, we followed Jeff and Anne as they created new a sun cover for the dodger on s/v Pilgrim, but the project was not complete. This is the rest of the story...
Here is a link to… Sun Cover for Dodger Windows – Part 1
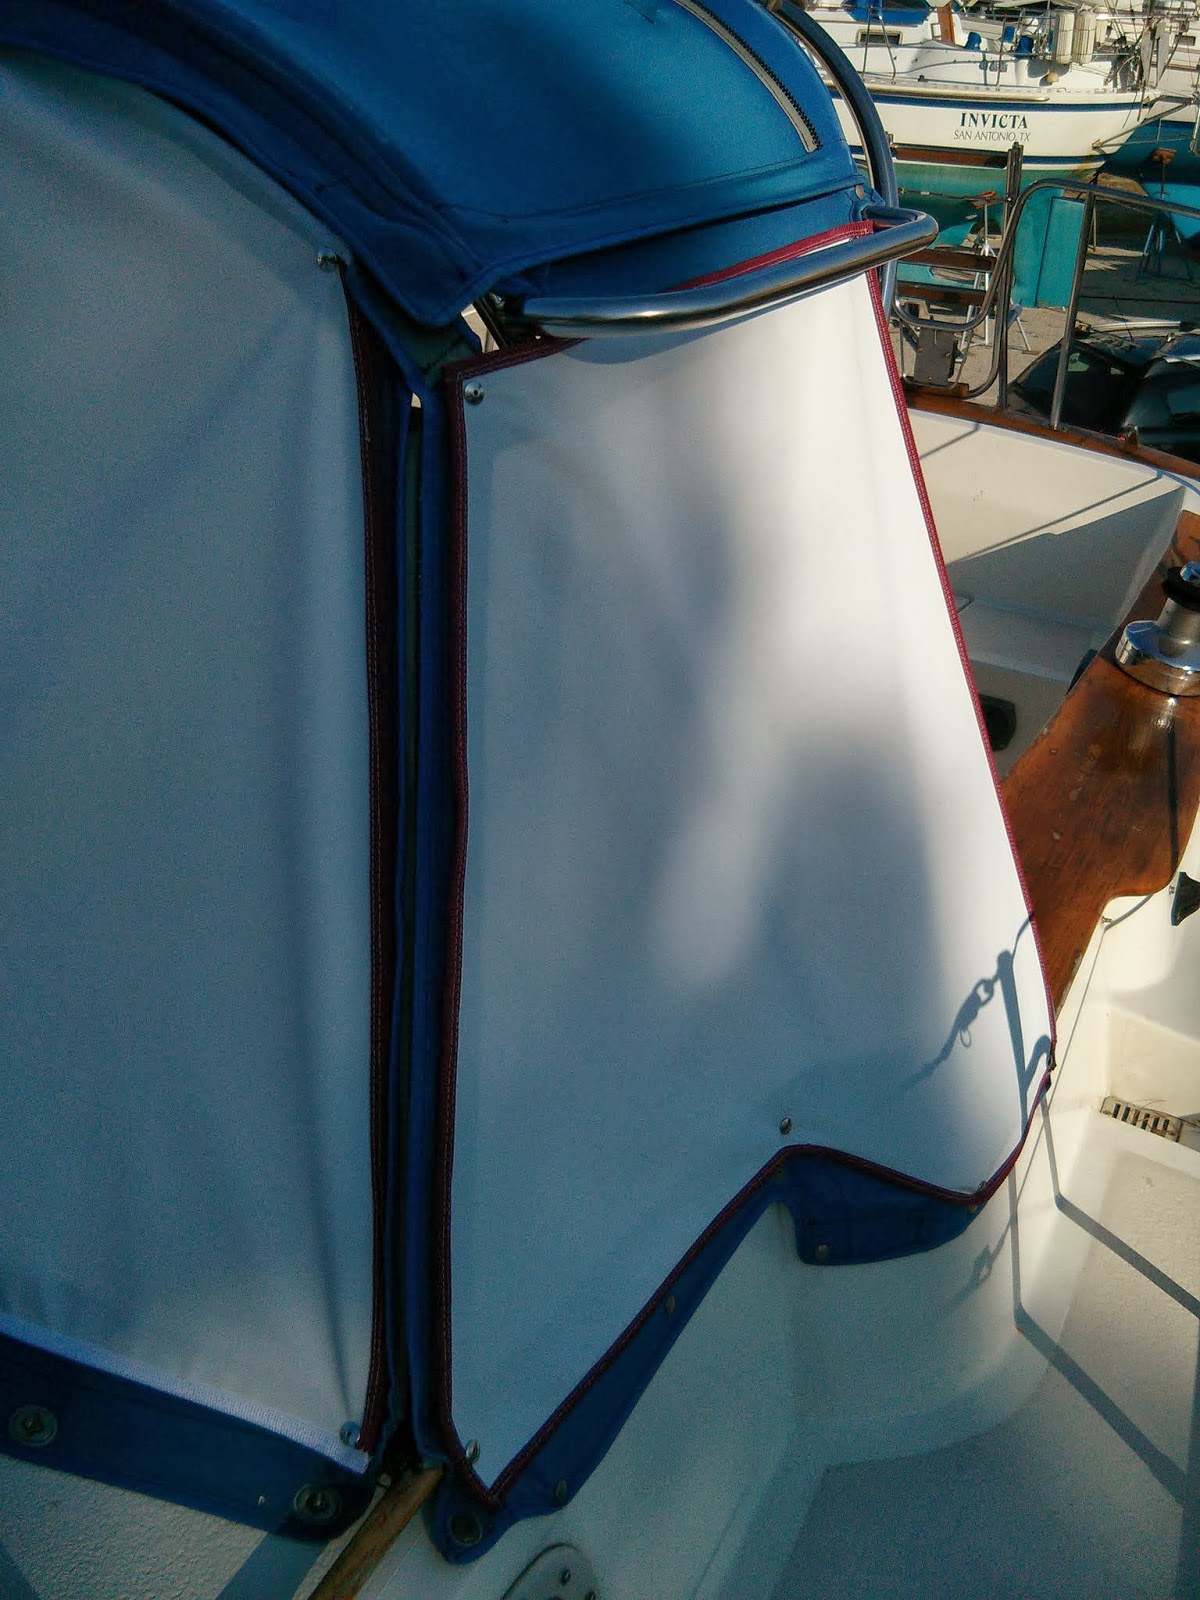
Due to the irregular shape of the side windows and some challenging topography where the dodger meets the cockpit combing, I decided to start the install with the center panel. I’ve installed snaps on past projects, but for this project I had a new tool in the arsenal… the Snaprite by Sailrite.
inaugural use of the snaprite system Specialized dies transform a rivet gun into a tool for placing and installing snaps. The sailrite instructionalvideo explains this system far better than I could hope to do in text.
Front panel installed now onto the sides As with any tool there is a learning curve. I broke multiple mandrels attempting to set a single snap stud (base) and still was unable to achieve a proper roll over on the eyelet barrel. Achieving a secure set on the studs was so frustrating that I reverted to the old system of using a die and punch by the time I began work on the side panels . The Snaprite tool did shine when used for locating and setting the snap button & socket into the new sun covers. This tool really took the guess work out of locating the proper place to install the top portion of the snap.
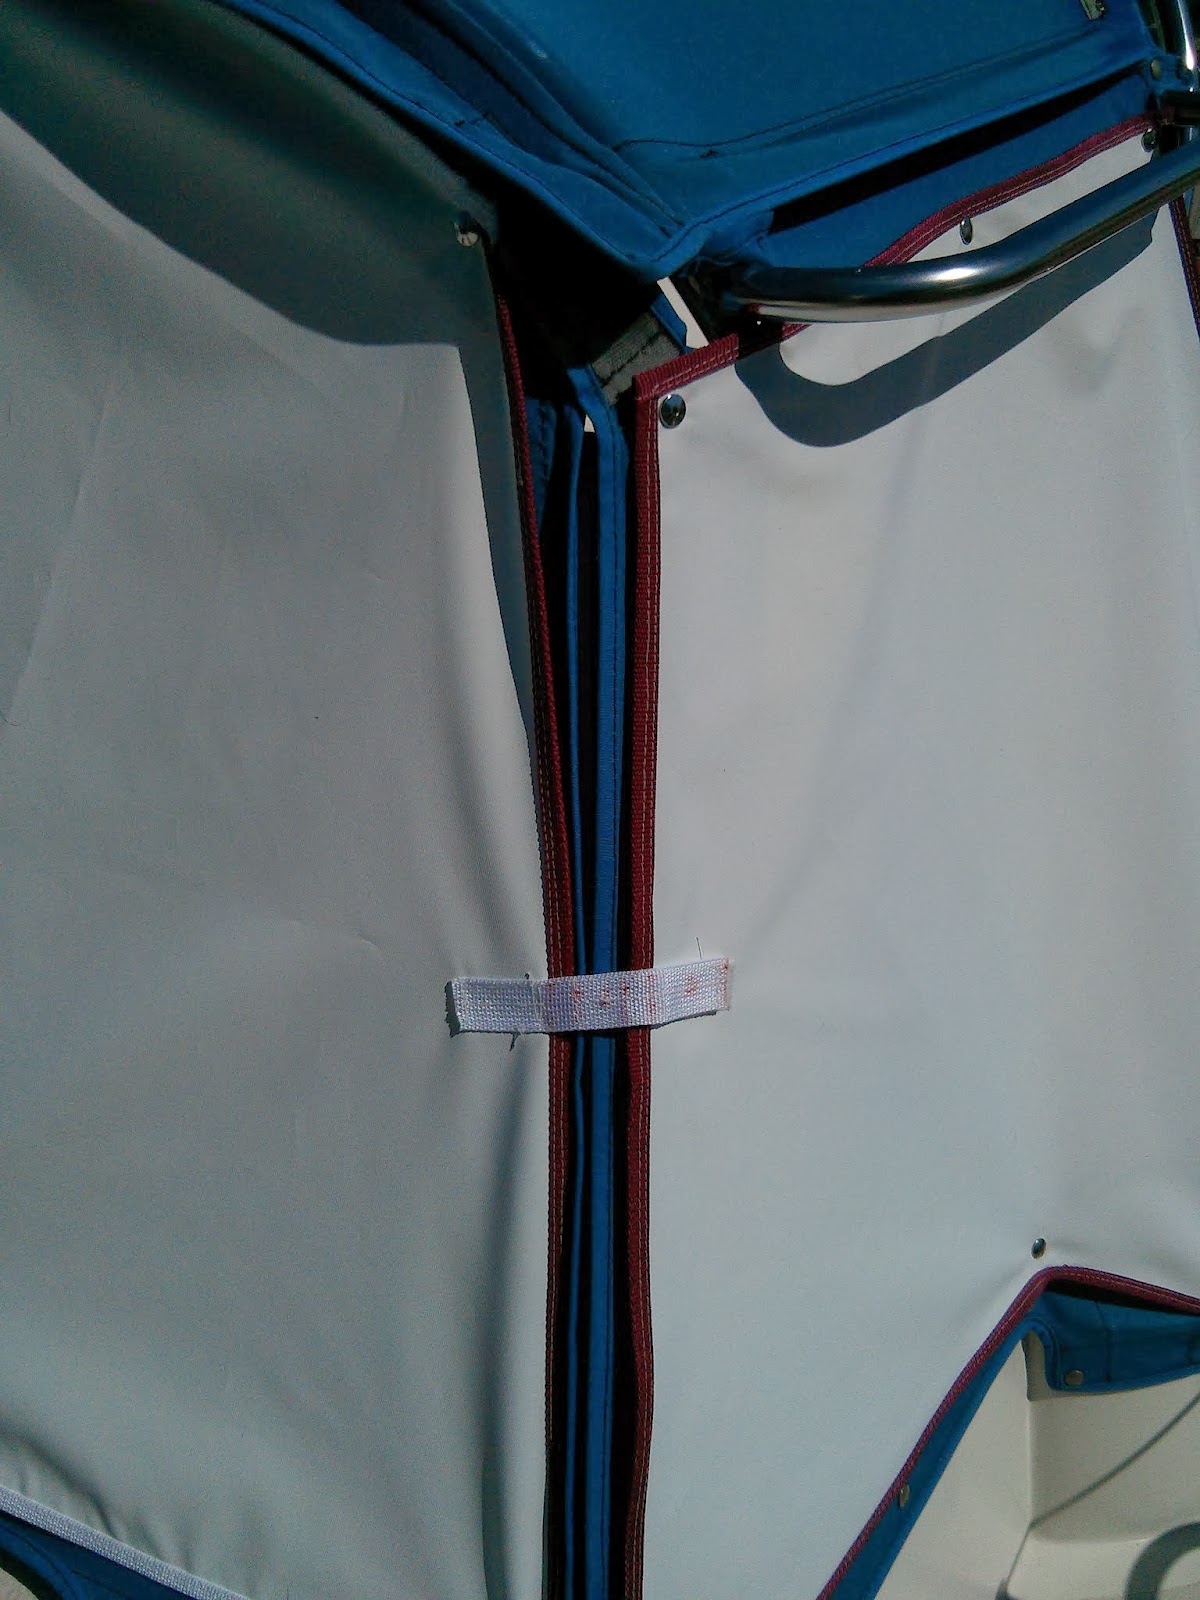
Once both the center and side panels were installed, I realized that the long gap where the center panel met the side panes could catch enough air to generate noisy flapping.
the intersection of the two panels did not provide a suitable area to mount a snap stud The dodger did not have a site for attaching snaps in this area. I return home to the sewing machine with the covers in tow. If the site was unsuitable for a snap, perhaps a velco?
using webbing an velcro to secure the panels at the intersection A few inches of of velcro and some 1” flat webbing saved the day.Not only to the cover’s protect the widows from UV damage, but they provide a nice bit of privacy when in a crowed anchorage or at the dock.
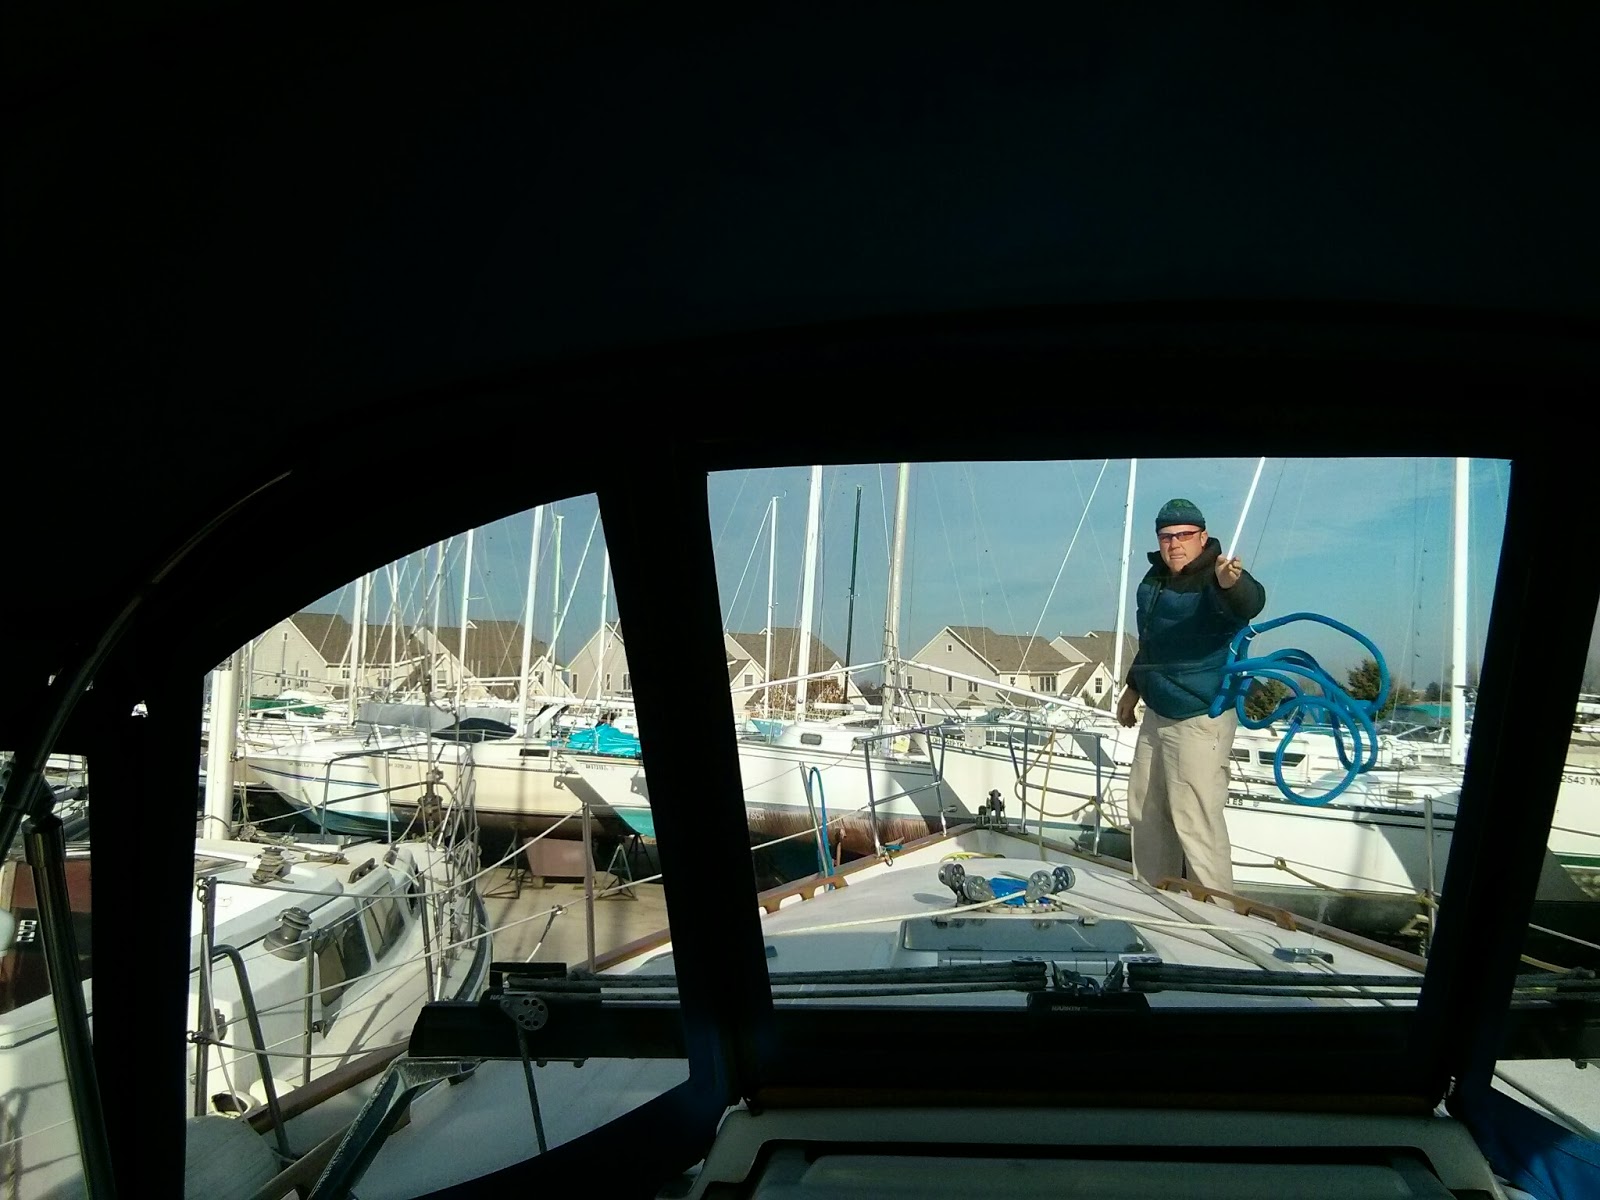
the view from the cockpit with the sun covers installed Creating the dodger sun covers is the first project fully completed on SV Pilgrim!
As with most of our projects we have created a photo album – Dodger Sun Covers – Winter 2014, that contains additional images. All our albums can also found in the links section, right side pane of our website – M382Pilgrim.blogspot.com


Friday, April 11, 2014
Best in show
This post originally appeared on Windborne in Puget Sound
 We've been to a lot of boat shows since our first, in Chicago, in 1971. From one year to the next, you see mostly the same gear. But every once in a while, you see a new product that is truly new and innovative. This was one of those rare shows, and The Anchor Buoy is one of those rare products.
When we anchor here in Puget Sound, we always try to be as far from other boats as possible. Most times that works our for us, but on busy weekends the anchorages are crowded, and then there is always that yahoo who drops his anchor too close. We have experimented with using an anchor buoy, but managing the buoy and its line while retrieving the anchor was just too big a job. And then, with our tidal range here that can reach 16 feet, how much line to put on the buoy? Too little and the buoy will be submerged at high tide; too much and the buoy no longer marks the location of your anchor.
The Anchor Buoy addresses these and many more issues...
Oh yeah, the bottom line: boat show price is $249.
When we anchor here in Puget Sound, we always try to be as far from other boats as possible. Most times that works our for us, but on busy weekends the anchorages are crowded, and then there is always that yahoo who drops his anchor too close. We have experimented with using an anchor buoy, but managing the buoy and its line while retrieving the anchor was just too big a job. And then, with our tidal range here that can reach 16 feet, how much line to put on the buoy? Too little and the buoy will be submerged at high tide; too much and the buoy no longer marks the location of your anchor.
The Anchor Buoy addresses these and many more issues...
- First, it self-deploys. There is an encapsulated microprocessor inside it that knows when it is submerged, and reels out more line to compensate. Therefore no action is required to deploy it - you just drop your anchor.
- There is a tilt switch inside that detects when the buoy is no longer upright, indicating that its mooring line is slack - it then reels its line in until the slack is removed. This accommodates tidal changes, and it also means that no action is required when retrieving the anchor - the buoy reels itself in.
- It holds 100 feet of mooring line internally - That should cover the vast majority of anchoring situations.
- There are two LEDs on the upper surface that automatically illuminate after dark, so your anchor position is visible even at nite.
- It's all solar powered via an encapsulated solar cell and LiPO battery.
- It's made right here in the USA, in Garden City, Idaho. This is important to me, as whenever possible I try to support American workers and the American economy.
Oh yeah, the bottom line: boat show price is $249.
Wednesday, April 9, 2014
Sun Cover for Dodger Windows
Jeff and Anne have a new boat, s/v Pilgrim! To provide continuity here, you can follow this link to their previous boat's projects. Today, they give us some instruction in canvas work and stitching with their Sailrite LSZ-1...
The quality of Pilgrim’s dodger stood out on my first visit to the vessel. The clarity of the strataglass windows is remarkable when compared to other vessels in our boat search.
Jeff on the foredeck while prepping Pilgrim for transport in the Sandusky Harbor Marina Now that we own Pilgrim and plan to take her south, protecting her wonderful windows from year round, low latitude UV damage is a high priority on the project list. Fabricating a removable sun cover for the windows seems like the best solution.
We feared using royal blue that matches the existing dodger fabric would generate too much heat in warmer climates. Our choice of colors… a contrasting white UV resistant fabric.
Using the center window panel to create a rough cut out of the fabric. Initially I attempted to measure out the pattern. This worked well to estimate the amount of fabric for the job, but proved too inaccurate for creating a pattern. After one false start that resulted in a permanent blue line across the lower section of the front panel, I tossed aside the tape measure and simply outlined the panels to create a rough cut out of the covers. With the fabric atop the panels I was able to fine tune the dimensions of the cover and thus skipped creating a pattern.
I placed the fabric atop the panel to fine tune the shape of the cover. The side panels were created via an identical process.
using the side panels as pattern for the cover In the design phase, I decided to use edge binding rather the hemming the covers. Using red or green 1” webbing as binding tape for the edges allows for easily identification of the port & starboard side panels. Additionally, I used red and green on the corresponding sides of the center panel to assist with orienting it to the dodger. White binding tape was used for the top and bottom edges of the center panel.
adding a second row of stitching to the binding tape on the port side panel To provide additional longevity to the covers the edge binding is double stitched in place.
The covers were now ready for the installation of snaps that will affix them to the dodger. I felt the snap placement would be more accurate if completed with the windows installed in the dodger. Time to load up the project and head out to the boat…


Tuesday, April 1, 2014
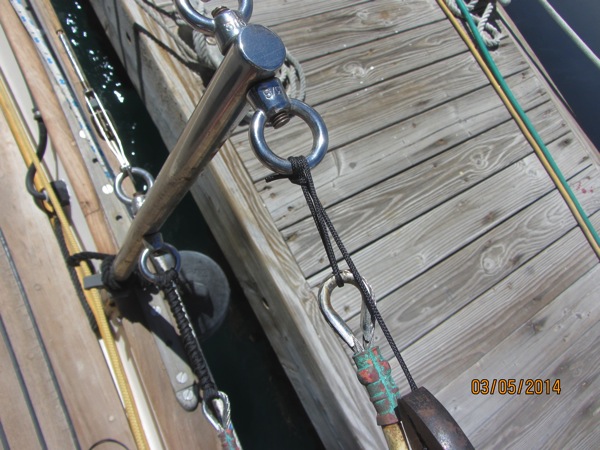
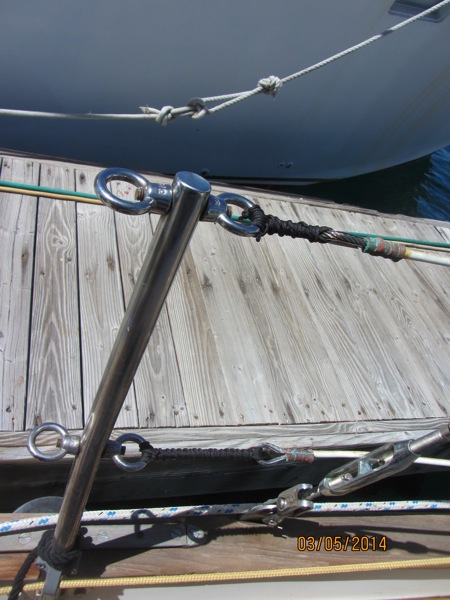
Who needs turnbuckles?
Steve and Lulu who live aboard s/v Siempre Sabado don't use turnbuckles on their lifelines - they use lashings...
As reported earlier, when we got back to Siempre Sabado from our trip to the U.S., something just didn’t look right. Then I saw it: the upper lifeline was no longer attached to the stanchion. There were a few strands of nylon left on the stanchion ring but that was it. Then, a couple days later we were visiting with some friends on the dock. Lulu was sitting on the cabintop and put her feet up on the lower lifeline. Guess what? Yep, that was enough to break through what remained of the lashing on the lower lifeline. I suspect that the degradation that led to the final failure probably happened in the last 6 months or so. Last time we were out was when we were coming back to La Paz last May (Jeez! Has it been that long?). During that trip we didn’t notice any issues with the lifelines in spite of abusing them with the dinghy every time we launched or retrieved it. Nevertheless, I’ve added replace lifeline lashings to my annual to-do list.
It’s been almost exactly two years since I replaced our lifelines in Mazatlán. At that time, I didn’t really document the lashing process itself so I thought I’d take care of that today.
This time, instead of white 1/8″ nylon braid, I used black 3/32″ nylon braid. The main reason for the change was that I though black might be a little less susceptible to damaging UV rays, but mostly because we have a huge spool of it we bought at a commercial fishing outfit in Puerto Peñasco. Not sure what the fishermen use it for but they must use a lot since the huge spool we bought was the smallest one they sold.
The first step is to tie the line to the ring on the stanchion. I used a fisherman’s bend.
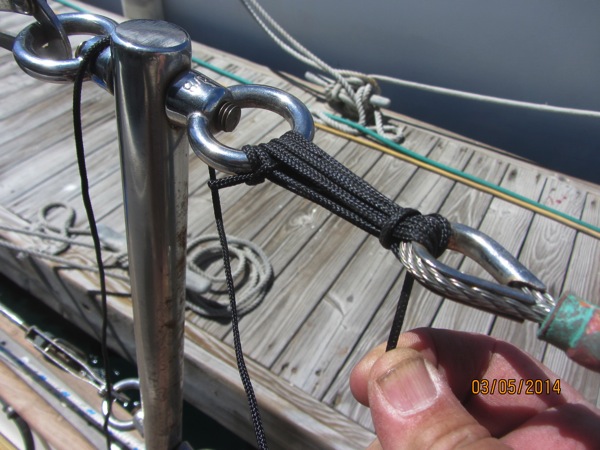
Then just start wrapping line between the ring and the lifeline, pulling it as tight as you possibly can each time.
I suggest using pliers to pull the line tight. I figured this out a little too late.
Once you have as many wraps as you think is appropriate (I used 6), pull it tight and tie it off with a half-hitch pulled mondo-tight with the pliers.
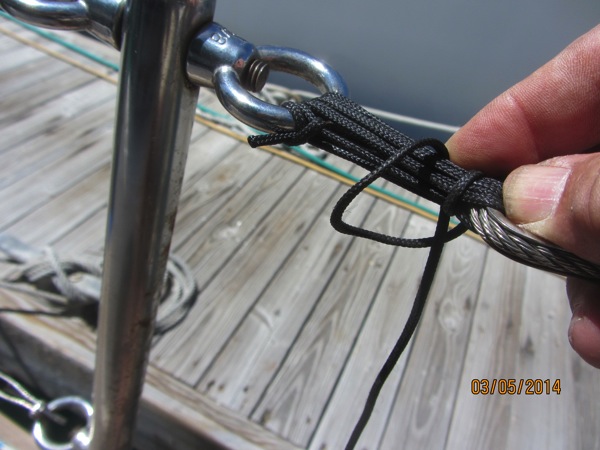
Now, just keep tying half-hitches, always in the same direction, until you reach the other end.
When you reach the end, you can finish it a couple of ways. Last time I just tied a last half-hitch and then tied an overhand knot up close in the end. This time I decided to tie the end off with a clove hitch on the stanchion ring followed by the pulled-very-tight overhand knot. I didn’t get this overhand knot as close to the ring as I would have liked but I suspect it’ll be just fine. As soon as the wind dies down, I’ll apply some heat and fuse the overhand knot to itself so it’ll never ever come loose.
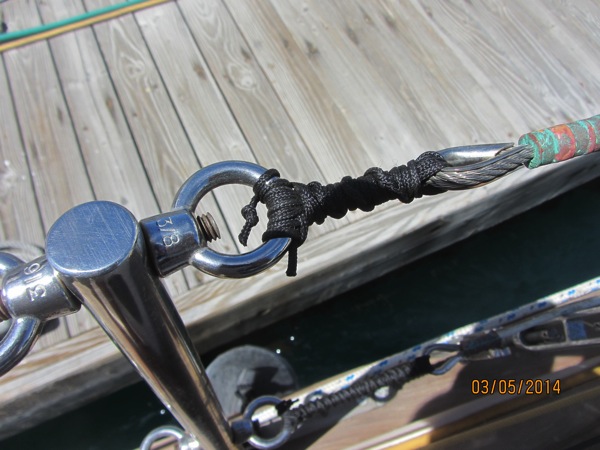
Personally, I don’t think these look quite as nice as the white ones did but they look a LOT better than the parted ones laying on deck.
If you have a gate in your lifelines, be sure it’s closed before you start lashing. You can put incredible force on the stanchions when you pull the lashings tight and you don’t want to bend a stanchion. I didn’t put the slight bend in this stanchion, it was that way when we bought the boat. Although it’s open now, I did have the gates closed while lashing.
So there you have it. Change your lashings at least yearly. It’s too easy and cheap to do to take a chance on the line lasting any longer than that.


Subscribe to:
Posts (Atom)


