We like the places that are more wild and remote. Places that don't have internet connections, mechanics or Qwiki-marts. Those are the places that are more interesting to us. This means we have to learn to be self-reliant. We have to troubleshoot our own problems and carry with us what we need. To that end, we consulted the ultimate in self-reliant sailors - Ken and Susan on s/v Bint al Khamseen, recently back from a two-year tour of the Pacific Ocean including Mexico, the south Pacific islands, New Zealand and a 40-day passage back to North America.
Along with fashioning an AIS receiver from a bear tracking device and hand-crafting a new rudder for their self-steering gear while anchored in an atoll in the middle of the frickin' ocean, they happen to brew incredibly good beer. Not good as in: "wow, that's really good for home brew". More like: "holy crap, that's better than beer any beer I can buy".
Having experience with Canada's sky-high liquor prices, mediocre beer and lack of civilization from which to buy said beer, we decided brewing our own was a better option. Before we left Seattle, we invited Ken and Susan over to teach us their brewing witchcraft. With their gracious permission, we're re-posting their boat-friendly, hop-a-liscious beer recipe.
Ken transferring the wort into the fermenter.
Making Beer Aboard Sailboats
Once you’ve got all of your ingredients, it’s a matter of making the wort, letting that ferment for 3-5 days, then bottling and letting it sit for another 2 weeks. Then drink up!
Shopping list (for a 1.5-2 gallon batch)
3 lb amber dry malt
1.5 oz hops (pelletized)
½ package Nottingham or Ale yeast
¼ cup corn sugar
2.5 gallon collapsible water jug
funnel
vapor trap
One step cleaner
Growlers or plastic jugs (that can hold pressure) for bottling and caps
Making wort
In a large pot, bring 1/2 gallon of water to a boil for a few minutes (kill off any microbes). We use our pressure cooker without pressurizing it.
Add 3 lbs. dry malt to simmering water
We use amber malt for a Manny’s knock off
Use light malt for a pilsner beer
Use dark malt for a more chewy beer (porter…)
If you use liquid malt, need 20% more than dry and less water
Stir while malt dissolves (don't scorch the bottom!)
Add 1oz of hops
Many varieties of hops...for a basic IPA use anything that starts with a C (Cascadia is a great one)...try different types for different types of beer
Use pelletized hops (non-pelletized versions make a total mess)
Simmer until hops are dissolved, turn off heat and add another ½ oz hops (for a good, hoppy aroma – skip if you don’t want it too hoppy)
Allow the wort to cool
You can do this quickly by submerging most of the pot in an ice bath or sea water
Decontaminate fermenting container
We use one step food grade cleaner – it’s a white powder that isn’t harmful if some is leftover
Mix one step cleaner with water and clean the heck out of the 2.5 gallon jug, funnel, vaport trap, nozzle, etc – anything that the beer will come in contact with while transferring or fermenting
Fermenting
In a 2.5 gallon jug, add ½ gallon of water
Add in the wort (get all of the hops!)
Add in another ½ gallon of water
Make sure this watered down wort mixture is at room temp (about 80F) before adding yeast
Add ½ of a 0.3oz pack of brewing yeast
We use Nottingham or an ale yeast
Different yeasts will change the flavor, so play around with them
Give the container a good shake to mix in yeast and oxygenate the wort, then burp out most of the leftover air
Add vapor trap and ensure air can escape
Leave the mixture to ferment until it stops bubbling (3-5 days depending on your temp – shorter in warm areas)
Bottling
This amount of beer fits nicely into 3 ½ gallon growlers
Can also use old soda containers – anything that was built to take pressure (so don’t use water bottles because they’ll explode under the pressure)
Clean your bottles, funnel, etc with the TSP solution mentioned above
Mix a solution of ¼ cup corn sugar with ¾ cup sterile water (sterilize by boiling then allow to cool a bit)
Add this sugar solution directly to the fermenter and mix around a bit for equal distribution
Pour into bottles (leave an inch of head in each bottle)
We use a funnel and strainer to try to get rid of some of the sludge
Allow to sit in bottles for 2 weeks – then refrigerate and enjoy!
Life aboard is living large, in a small space. Every boat owner has found ways to make life in that small space easier, more comfortable, more convenient. The idea behind this site is to provide a place where these ideas can be shared amongst the boating community. To participate, send your contribution to SmallBoatProjects at gmail dot com.
Pages
▼
Tuesday, July 31, 2012
Self reliance
Jason and Christina on s/v hello world have a project here that everyone is going to want to try: Manufacturing an essential boating fluid right on board! Read on...
Thursday, July 26, 2012
The Lord of the Rings
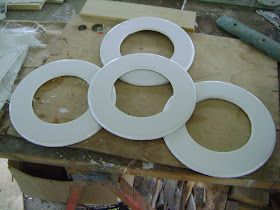
Not long ago, Mike of s/v Chalice showed us how he made some new fiberglass trim rings. Now we get to see how they worked out:
So I got the port light rings installed. Here are some before and after shots of the install.
The finished rings.
From update 6-9-2012
This how I initially installed the port lights. Just so I could get them in.
From update 6-9-2012
Fitting them.
From update 6-9-2012
And installed.
From update 6-9-2012
From update 6-9-2012
Tuesday, July 24, 2012
Dinghy floor repair/improvement
Over at Dock Six Brian fixes a broken floor slat in his roll up dinghy:
As last season faded into winter, an errantly placed 6 gallon water jug, overweight blog scribe and hyperactive boatdawg all attempted to occupy the same roll-up floor slat on Quack. One busted floor slat later, I had another project to add to the off-season punchlist. A scrap of ply was pressed into service as a scarph plate to get us through the last month of the season, but a long term solution was needed.
We never roll up our " roll-up" dinghy. We bought a roll-up for the leaner weight over hard floor/ inflatable floor models, so as to not overstress the low-buck davits.
And because it was cheaper. C'mon, do I have to say it?
(Just as an aside, has anybody ever rolled up a roll-up? If so, have you ever managed to roll it up enough to get it back into what the brochures optimistically describe as the "convenient carrying case"?)
Okeydoke, now I need to fix the floor without adding a significant weight penalty. Time to turn some more crap into stuff again. Measure, measure, find a couple of pieces of scrap 1/4" ply that are close to the right size, cut 'em down to eliminate the "close to" part, laminate 'em together, clamp, roll epoxy on the outside, seal end grain, back roll epoxy to give the deck a non-skid surface, varnish, varnish again,. fasten to Quack with stainless screws and finish cups salvaged from DonorBoat and...
...Before...
After:
The floor is now significantly stiffer and the boat will now attempt to plane.
Total build time: 20 minutes
Total cure time and dry time: Three days- one for epoxy, two for eight hot coats of varnish
Total install time: 10 minutes
Total cost: $0- all materials left over from other projects. If new material needed, under $50.
Thursday, July 19, 2012
Dual dinghy tips
For full-time cruisers, the dinghy is the family car. Mike and Rebecca, living full-time aboard s/v Zero to Cruising in the Caribbean have a couple of tips for us on dinghies... learn from their experience:
Given just how important the dinghy is to a cruising sailor, whenever you tie yours to your boat or to a dock, use two separate lines. This tip was shared with us by a long-term cruiser who adopted the practice himself after observing just how many dinghies have a tendency to go astray. The basic idea is that while one line may work itself loose, the chance of 2 separate lines doing the same is next to nil. We know multiple people who have had their dinghies drift away and in fact, without naming names, we know someone whose dinghy went walkabout just yesterday! The strange thing is that this particular sailor subscribes to the two-line suggestion that I just mentioned. He always ties his tender to the boat with 2 lines, except just that one time! Fortunately we were on the trampoline when it went walkabout and thus noticed it drifting away. We were able to retrieve it for him before it went too far.
Which brings me to my second tip. After several rescues of people in dinghies that had run out of gas or had engine troubles, and towing misc. tenders, I installed a small cleat on the back of our dinghy. I picked up the cleat for a few bucks at a chandlery and after drilling a couple of holes in the fiberglass, through-bolted it to the transom. The entire job took about 10 minutes. Although I don’t think I’d rely upon it to pull a water skier, I have used that cleat to pull a 40+ foot sailboat sideways in Cumberland Bay when they were having difficulty getting a stern line to shore. It makes the act of towing something a lot easier, especially if you are alone in the tender. We also use that cleat whenever we set a stern anchor out to keep our dinghy away from a not-so-good dock.
Tuesday, July 17, 2012
Rudder work
Mike of s/v Chalice takes us thru the removal of his rudder in order to replace his shaft. This is seen by most as a daunting task, but Mike makes it sound easy (for his boat, at least):
When installing the engine, I needed to replace the old prop shaft with a longer one. I had anticipated this and had a replacement one on hand. Even though there appears to be a cutout in the rudder where it looks as though the shaft will slide in with out removing the rudder, it will not slide past. So, I had the remove the rudder. Not near as hard as I imagined it would be.[Editor's note: I have become insanely fond of the GoreTex teflon packing. You tighten it until there are no drips when the shaft is turning. And it runs cool. If I was replacing my rudder packing today, I'd use it there too.]
If you have to do it, here is how. First remove the steering cables from quadrant, then remove quadrant (4 bolts), then loosen a little the 3 bolts/screws that hold down the packing in the packing gland. On the outside place something under the rudder to keep it from falling out when you remove the rudder bottom pivot. I used a jack so I could lower it slowly out of the hole. You will not need to dig a hole under the rudder to gain room. You should have plenty of room if your boat is blocked up as normal, with about 12 inches under the rudder.
Installation is the reverse. I picked this time to replace my packing and cleanup and re-bed the lower pivot. I did not take a lot of pics of this process. It appears that the packing gland for the rudder shaft is something that was made in house by Cabo Rico. I also added a grease zerk to the lower pivot point to make it easier to re grease.
Thursday, July 12, 2012
Oil Lamp Mounting & Heat Shield
Please welcome new contributor Rick of s/v Cay of Sea! Rick shares with us a clever adaptation of a brass door kick plate, thus avoiding the "marine tax"...
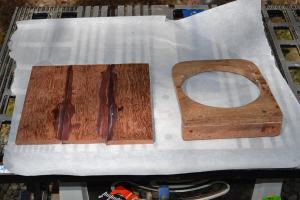
Warm weather has ensured good luck with epoxy curing, and I’ve finished, broken, and remade the lamp bracket – which required epoxy for success. I never do anything right the first time, and the lamp bracket was no exception. First of all, check this photo of the bracket from my last post. Notice anything special about the grain of the wood?
The grain runs across the width
Yeah, see how the grain runs across the narrow section of the bracket? That creates a weak spot. I didn’t realize that until I broke it across there with the slightest of effort. So, here is what I did to fix it:
The new board you see glued up was to be the new bracket oriented with the grain running the other way. Then I had a truly inspired idea: what if I glued the new on top of the old (repaired) bracket? That would be very strong indeed, with no tendency to break across the narrow dimension. That’s what I did. Here it is installed.
A new edge-glued teak board
You can see the two layers of wood here, and it is very secure. I visited with my hardware store only twice to get the fasteners sized correctly, but managed to mount it and varnish it twice.
I think I’m going to install a heat shield on the bulkhead behind the lamp. I don’t know if the bulkhead is going to get hot or not, but there is no need to take a chance.
I dug through my shed and found the door kick-plate. Happily, it’s polished brass, so will match the lamp well. Also happily, the edges and corners were pre-drilled. All I had to do was purchase stand-offs and fasteners. The stand-offs were pretty straightforward. 7/16ths diameter, 1/2 inch long steel sleeves did the trick. I got the correct fasteners on my second trip to the hardware store, because I got the wrong type of screw head on the first trip. Yeah – story of my life. I never get it right the first time around. For the record, unless your material is counter-sunk, flat-head screws won’t fit flush. I got regular round-headed screws and it looks and works much better.
I drilled mounting holes in the bulkhead for the plate, which I cut to size with my Dremel. I experimented with sheet metal shears, but they left a distorted, slightly bent edge. The Dremel was clean, and the rough edge was easy to smooth with sandpaper and sanding drum on my regular drill.
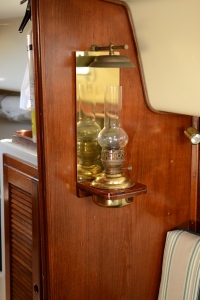
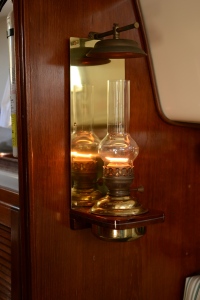
Now mounted on the bulkhead, it looks like this:
Oil Lamp with Heat Shield
Unanticipated benefit -
reflection of lamp provides
more light in the area.
Tuesday, July 10, 2012
Spiffing up the cabinet doors
Brian over at Dock Six shows us once again how a little work and some left-over scraps can be used to good effect:
I turned some scrap luan 1/4" ply and pine corner mould into new galley cupboard doors, replacing the old plain ones below:
...with doors that are a little brighter and lighter. The majority of the wood was free, although I did have to spend $6 at Lee Valley Tools on the handles.
Friday, July 6, 2012
On sprouting….
Up north on s/v Letitgo, they now have fresh greens...
Our friends Dawn and Tom had heard of our previous adventure with sprouting and must have taken pity. So during our last meeting they gave us the Tube a 70″s looking contraption that make the art of sprouting easy.Sadly, when I did some research, I found this:
On the first day after 12 hours soaking.As we are all mostly vegetarians some by choice some by association. The need for fresh crunchy leaf is our reality. So after canning, bread making and yoghurt the long lost tradition of sprouting had to be revived. Sunflower was what we had in stock in the cupboard and we gave it a trial.
6 days later we have these amazing greens, phew… we are now “safe”. We will have our greens onboard! Coincidentally today is our son’s 15th birthday today! To symbolize your “birth” day *B* we celebrate the birth of our sprouts! What a gift….
Happy Birthday *B*!Dawn and Tom thank you so much for leading the way and sharing your knowledge. You will travel with us forever.
Before we tell you how much we like The Tube, we need you to know that The Tube is no longer available. We keep its page on our site for those lucky enough to have one. We are sorry. The manufacturer shut down around 2005. We even asked if they would sell us the sprouting portion of their business. They never responded. It wasn't the best Sprouter - Easy Sprout has always been better, but we are sad that it is gone...
Tuesday, July 3, 2012
Hatch Screens
Mike of s/v Chalice makes some professional-looking screens and frames. Using the spline is the way the pros do it...
Wanted some new hatch screens for the head and aft cabin. So here is what I did. Nothing new really.
From Update 5-2-2012
From Update 5-2-2012
From Update 5-2-2012
From Update 5-2-2012
From Update 5-2-2012
From Update 5-2-2012
From Update 5-2-2012
From Update 5-2-2012
From Update 5-2-2012


